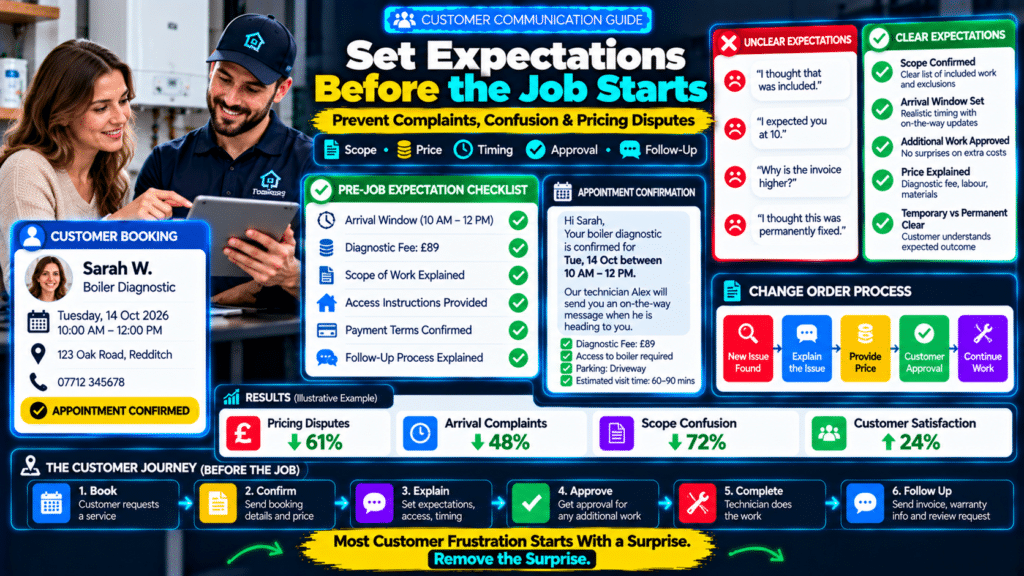
Many customer complaints begin before the technician even starts the work.
The customer expected:
an exact arrival time.
The business meant:
a two-hour arrival window.
The customer thought:
the quote included everything.
The business meant:
diagnosis only.
The customer thought:
the repair was permanent.
The technician meant:
temporary solution until the correct part arrives.
Nobody necessarily tried to mislead anyone.
The problem was:
expectation mismatch.
That is why learning how to set customer expectations before a service job can reduce:
- complaints;
- pricing disputes;
- callbacks;
- cancellations;
- negative reviews;
- technician stress.
A strong customer communication process should clarify:
What Will Happen
↓
When It Will Happen
↓
What It Will Cost
↓
What Is Included
↓
What Is Not Included
↓
What Happens if Something Changes
The goal is simple:
the customer should understand the service before the technician starts.
Why Customer Expectations Matter
Customers judge service partly by comparing:
what happened
with:
what they expected to happen.
Imagine two identical jobs.
Customer A
Was told:
Our technician will arrive between 10 AM and noon. We will send you a message when they are on the way.
Technician arrives at:
11:35 AM.
Customer may be perfectly satisfied.
Customer B
Was told:
We’ll be there at 10.
Technician arrives:
11:35 AM.
Same technician.
Same job.
Completely different customer experience.
The difference is expectation setting.
Expectations Affect More Than Satisfaction
Poor expectations can create operational problems.
For example:
- technician waits because customer is not ready;
- customer refuses additional work;
- invoice is disputed;
- customer expects free follow-up;
- customer complains about delays.
Clear communication reduces friction for both sides.
Step 1: Explain the Appointment Type
Do not assume the customer understands what they booked.
There is a major difference between:
- diagnostic visit;
- estimate;
- repair appointment;
- maintenance service;
- installation;
- emergency call-out.
Say clearly what the appointment is for.
Example
Weak:
We’ve booked you for Tuesday.
Better:
We’ve booked a diagnostic visit for Tuesday. The technician will inspect the boiler, identify the likely fault, and explain the repair options before additional work is approved.
Now the customer knows:
diagnosis ≠ guaranteed repair during the first visit.
Step 2: Set a Realistic Arrival Window
Customers often become frustrated by vague timing.
Avoid:
We’ll be there sometime tomorrow.
But also avoid promising an exact minute if your schedule cannot support it.
A better approach:
Your arrival window is between 1 PM and 3 PM. We’ll send you an on-my-way notification when the technician is heading to you.
This provides structure while allowing for:
- traffic;
- previous jobs;
- emergency delays.
Explain That Arrival Window Is Not Job Duration
A common misunderstanding:
1–3 PM arrival window
does not mean:
job finishes by 3 PM.
If relevant, explain this.
For example:
The technician will arrive between 1 and 3 PM. The visit usually takes around 60–90 minutes depending on what they find.
That gives the customer a better idea of the full commitment.
Step 3: Explain the Pricing Model
The customer should understand how pricing works before the visit.
Possible structures include:
- fixed price;
- hourly rate;
- call-out fee;
- diagnostic charge;
- minimum service charge;
- estimate after inspection.
Do not surprise customers after the job.
Example: Diagnostic Fee
The diagnostic visit is £89. This covers the technician’s inspection and diagnosis. If repair work is required, we’ll explain the additional price before proceeding.
Clear.
Simple.
Professional.
Example: Hourly Pricing
The first hour is £120, then £80 per additional hour, plus materials. The technician will explain any significant additional costs before continuing.
Example: Fixed Price
The quoted price is £450 and includes the listed work and materials. Anything outside that scope will require your approval before additional charges are added.
The specific pricing model matters less than clarity.
Step 4: Define Exactly What Is Included
A quote should not rely on assumptions.
Suppose you quote:
£1,800 for EV charger installation.
Does that include:
- charger;
- cable;
- labour;
- testing;
- wall drilling;
- certification;
- disposal?
Write it down.
Scope Example
Included
- Supply of charger
- Standard cable run up to 10 metres
- Installation
- Testing
- Commissioning
Not Included
- Ground excavation
- Consumer-unit replacement
- Structural repairs
- Additional cable beyond 10 metres
This reduces disputes later.
Step 5: Explain What Is Not Included
This is just as important as what is included.
Customers often assume unspecified work is part of the quote.
For example:
A landscaper quotes for:
patio installation.
Customer may assume:
- old shed removal;
- drainage modification;
- fence repair
are included.
If they are not:
say so.
Use Clear Exclusions
Example:
This quote does not include removal of existing fencing, electrical work, or drainage alterations unless listed separately.
That is far better than trying to resolve the misunderstanding halfway through the project.
Step 6: Explain What Happens if Additional Work Is Found
Service jobs often reveal new problems.
A technician may open a panel and discover:
- damaged wiring;
- corroded pipe;
- failed component;
- hidden water damage.
Customers should know the process.
A good rule:
No Significant Additional Work Without Approval.
Example
If we find additional work that affects the price, the technician will explain it and get your approval before continuing.
This protects:
- customer;
- technician;
- business.
Use Change Orders for Larger Jobs
For larger projects:
Original Scope
↓
Additional Work Identified
↓
Price + Timeline Explained
↓
Customer Approves
↓
Work Continues
Do not rely on:
We mentioned it verbally.
Document important changes.
Step 7: Explain Access Requirements
The appointment can fail if the technician cannot:
- enter property;
- access equipment;
- park;
- reach electrical panel;
- access loft.
Tell the customer what is needed.
Example
Please make sure the technician can access the boiler and electrical supply. If the property is vacant, let us know how access will be provided.
For commercial sites, you may also need:
- visitor registration;
- permits;
- site contact;
- parking instructions.
Pets and Children
Depending on the work:
Please keep pets away from the work area while the technician is completing the service.
This protects:
- safety;
- equipment;
- workflow.
Step 8: Explain Preparation Requirements
Some services require customer preparation.
Cleaning
Customer may need to:
- clear surfaces;
- provide access;
- secure valuables.
Landscaping
Customer may need to:
- move vehicles;
- unlock gates.
Electrical
Customer may need to:
- expect temporary power interruption.
HVAC
Customer may need to:
- clear access around equipment.
Send preparation instructions before the appointment.
Example
We may need to temporarily switch off power during testing. If you have equipment that should be shut down safely first, please prepare it before the technician arrives.
This prevents surprises.
Step 9: Explain Possible Disruption
Some service work is:
- noisy;
- dusty;
- disruptive.
Tell the customer.
For example:
The installation requires drilling and may create some dust. Our technician will protect the immediate work area and clean up afterward.
For larger work:
Water may need to be switched off for approximately two hours.
Customers handle disruption much better when they know in advance.
Step 10: Explain What the Technician Can and Cannot Decide
Customers may ask technicians for:
- free extras;
- discounts;
- additional work.
Define boundaries.
For example:
The technician can approve minor additional materials up to £50. Larger changes require office approval.
This helps prevent:
- inconsistent pricing;
- unauthorized promises.
Step 11: Explain Payment Expectations
Do not wait until the end to reveal how payment works.
Tell customers:
- when payment is due;
- accepted methods;
- deposit requirements;
- financing options if relevant.
Example
Payment is due after the service is completed. You can pay by card, bank transfer, or the secure payment link on your invoice.
For larger jobs:
A 30% deposit is required to schedule the installation, with the remaining balance due according to the payment schedule in the quote.
Clear payment expectations reduce collection problems.
Step 12: Explain What Happens After the Job
Customers should know what comes next.
Possible next steps include:
- invoice;
- warranty information;
- maintenance recommendation;
- follow-up appointment;
- review request.
Example
After the repair, we’ll email your invoice and service notes. If a follow-up visit is required, the technician will explain that before leaving.
That closes the loop.
Use Booking Confirmations
A booking confirmation is one of the easiest ways to set expectations.
It can include:
- date;
- arrival window;
- service;
- technician if known;
- address;
- pricing;
- preparation instructions.
Example Confirmation
Appointment Confirmed
Service: Boiler Diagnostic
Date: Tuesday, 14 October
Arrival: 10 AM–12 PM
Diagnostic Fee: £89
Address: 123 Example Road
Please make sure the technician has clear access to the boiler.
We’ll send an on-my-way notification before arrival.
Simple and useful.
Send Appointment Reminders
Customers forget.
Send a reminder:
- day before;
- few hours before;
depending on your workflow.
Example:
Reminder: Your ABC Heating appointment is tomorrow between 10 AM and noon. Please reply if anything has changed.
This reduces:
- no-shows;
- access problems;
- last-minute confusion.
Send On-My-Way Notifications
An on-my-way message can significantly improve the customer experience.
Example:
Alex is on the way and should arrive in approximately 25 minutes.
This reduces the need for customers to call:
Where is the technician?
It also makes the company feel organized.
Tell Customers When You Are Running Late
Silence causes frustration.
If the technician is delayed:
communicate.
Example:
Your technician is running approximately 30 minutes behind due to the previous job taking longer than expected. We apologize for the delay and will keep you updated.
Customers may still be disappointed.
But they are less likely to feel ignored.
Avoid Overpromising
A dangerous phrase:
We’ll definitely fix it today.
What if:
- part unavailable;
- diagnosis changes;
- additional work required?
Better:
Our goal is to diagnose and, where possible, repair the issue during the visit. If a part or additional work is required, we’ll explain the next step.
Accuracy builds trust.
Set Expectations Around Parts
If a job may require ordered parts:
say so.
Example:
The technician carries common replacement parts, but specialist components may need to be ordered.
Now a second visit feels like part of the process rather than a failure.
Explain Temporary Repairs Clearly
Temporary fixes are a major source of misunderstanding.
Customer hears:
fixed.
Technician means:
safe for now.
Use explicit wording.
Example:
This is a temporary repair to stop the immediate leak. The damaged pipe section still needs replacement for a permanent solution.
Put this in:
- job notes;
- customer communication.
Explain Warranties Clearly
Avoid vague promises such as:
Don’t worry, it’s guaranteed.
Explain:
- what is covered;
- for how long;
- what is excluded.
Example:
Our workmanship is covered for 12 months. Manufacturer warranties on supplied equipment are separate and subject to their terms.
Use wording appropriate to your jurisdiction and contracts.
Customer Expectations During Large Projects
Longer projects require more communication.
Set expectations for:
- start date;
- working hours;
- milestones;
- access;
- disruption;
- payments;
- delays.
Example Project Timeline
Day 1
Removal and preparation.
Day 2
Installation.
Day 3
Testing and finishing.
Day 4
Contingency if required.
Customers should understand:
estimated timeline ≠ guaranteed perfect timeline
if conditions can change.
Explain Possible Delays
Common causes:
- weather;
- supplier delays;
- hidden damage;
- permit delays.
Do not hide these possibilities.
Explain how the company will communicate if they happen.
Use Good, Better, Best Carefully
If presenting options:
make the differences clear.
Example:
Good
Standard replacement.
Better
Higher-efficiency unit.
Best
Premium model + extended warranty.
The customer should understand:
- price;
- benefits;
- limitations.
Avoid confusing upsells.
Do Not Use Technical Jargon Without Explanation
Customer:
What’s wrong?
Poor answer:
The diverter valve actuator isn’t modulating correctly.
Better:
The valve that directs the hot water is not opening properly. That’s why the system is not heating consistently.
Expertise includes the ability to explain clearly.
Document Verbal Agreements
If the customer approves additional work verbally:
record it.
Example job note:
Customer approved additional £145 for replacement valve at 2:35 PM.
For significant changes:
use written approval.
This reduces later disputes.
Use Job Notes to Protect Expectations
A good note can say:
Customer informed that current repair is temporary and full pipe replacement recommended within 30 days.
This helps if the customer later says:
Nobody told me.
Documentation protects both sides.
Train Technicians on Expectation Setting
Do not assume technicians naturally know how to explain scope.
Train them.
Useful script:
Before I begin, let me confirm what we’re doing today. I’m here to diagnose the heating fault. Once I identify the cause, I’ll explain any repair cost before I proceed.
That one minute can prevent major misunderstandings.
Teach Technicians Not to Promise What They Cannot Control
Avoid:
The office will definitely get this part tomorrow.
Better:
I’ll ask the office to check availability and they’ll confirm the expected delivery time.
Technicians should not create promises they cannot guarantee.
Set Expectations About Clean-Up
Customers notice the final condition of their property.
If your standard is:
work area left clean
say so internally and enforce it.
For some work, explain that:
- dust;
- minor disruption
may occur.
Then clean appropriately.
What About Customers With Unrealistic Expectations?
Some customers may expect:
- instant appointments;
- free additional work;
- permanent solution from temporary repair.
Do not agree simply to avoid conflict.
Clarify boundaries politely.
Example:
I understand you’d like the additional outlet included. That wasn’t part of the original quote, but I can add it as a separate item and confirm the additional price before we continue.
Clear.
Respectful.
Firm.
Use FAQs Before Booking
Your website can help set expectations before the customer even calls.
Useful questions:
- Do you charge a call-out fee?
- Do you provide free estimates?
- What areas do you cover?
- How long are appointment windows?
- Do technicians carry parts?
- How do payments work?
- Do you offer warranties?
Good FAQs reduce repetitive questions.
Set Expectations on Service Pages
Service pages should explain:
- what service includes;
- process;
- limitations;
- next steps.
For example:
Boiler Repair Process
- Book diagnostic visit.
- Technician inspects system.
- Repair options explained.
- Customer approves work.
- Repair completed where parts are available.
- Follow-up arranged if specialist parts are needed.
This improves lead quality too.
Customer Expectation Checklist
Before a service appointment, confirm:
- Appointment type explained
- Arrival window confirmed
- Pricing model explained
- Scope defined
- Exclusions defined
- Additional-work approval process explained
- Access requirements explained
- Preparation instructions sent
- Possible disruption explained
- Payment terms explained
- Warranty expectations clear
- Follow-up process explained
Track Expectation-Related Complaints
Create complaint categories such as:
- price misunderstanding;
- arrival-time expectation;
- scope misunderstanding;
- timeline misunderstanding;
- warranty misunderstanding.
Then measure:
Are these going down?
If not:
improve your communication.
Example Before and After
Before
Customer books by phone.
No confirmation.
No pricing explanation.
Technician arrives late.
Additional work added verbally.
Customer disputes invoice.
After
Booking confirmation sent.
Arrival window clear.
Price explained.
Scope documented.
Additional work approved.
Customer receives final summary.
The technical work may be identical.
The experience is completely different.
Set Expectations Without Overloading Customers
Do not send a:
4,000-word policy document
for a 30-minute service call.
Use the right amount of communication.
For small jobs:
- concise confirmation;
- clear price;
- arrival window.
For larger projects:
- detailed quote;
- scope;
- payment schedule;
- timeline.
Match the detail to the risk.
Customer Communication by Job Size
Small Repair
Need:
- appointment;
- call-out fee;
- access;
- payment.
Medium Installation
Need:
- scope;
- exclusions;
- timing;
- price;
- warranty.
Large Project
Need:
- detailed scope;
- milestones;
- payment schedule;
- change-order process;
- delays;
- responsibilities.
More complexity requires more documentation.
Common Expectation-Setting Mistakes
Promising Exact Arrival Times
When you cannot guarantee them.
Hiding Fees
Creates price disputes.
Unclear Scope
Customers assume more is included.
No Exclusions
Creates arguments later.
No Change Approval
Additional work becomes disputed.
Saying “Fixed” for Temporary Work
Creates false expectations.
Technicians Making Unapproved Promises
Office then has to break them.
No Confirmation Message
Customer forgets details.
No Delay Updates
Silence feels disrespectful.
Too Much Technical Jargon
Customers leave confused.
Sources and Further Reading
These official resources back up the methods in this guide and are worth reading alongside it.
- How To Avoid a Home Improvement Scam (FTC Consumer Advice): what customers are told to expect in written estimates and contracts.
- Manage customer reviews (Google Business Profile Help): how to reply to reviews on your profile.
Related guides
- How to Handle Customer Complaints in a Service Business: Step-by-Step Guide
- How to Improve Technician Utilization in a Service Business: Practical Guide
- How to Reduce No-Shows and Last-Minute Cancellations in a Service Business
- Tools, Software and Automation for Trades: Start Here
Frequently Asked Questions
Why is setting customer expectations important?
Because many complaints result from a gap between:
what the customer expected
and:
what the business intended to provide.
Clear expectations reduce misunderstandings.
What should I tell customers before an appointment?
At minimum:
- service type;
- arrival window;
- pricing;
- access requirements;
- what happens next.
Should I give an exact arrival time?
Only if you can reliably meet it.
For many field-service businesses, an arrival window is more realistic.
How should I explain additional work?
Tell customers:
If we identify work outside the original scope, we’ll explain the price and get your approval before proceeding.
Should technicians be allowed to change prices?
Only within clearly defined authority.
Larger changes should normally require customer approval and possibly manager approval.
How do I avoid pricing disputes?
Use:
- written quotes;
- clear scope;
- exclusions;
- change approvals;
- customer confirmation.
How do I explain a diagnostic visit?
Make clear that the visit is for:
inspection and diagnosis
and that repair costs may be additional.
Should I send appointment reminders?
Yes.
Reminders can reduce:
- no-shows;
- forgotten bookings;
- access problems.
How should I communicate delays?
Tell the customer as soon as possible and provide a realistic updated arrival estimate.
What should I do if the customer expects something that was never included?
Stay calm.
Refer to the documented scope and explain what would be required to add the extra work.
Conclusion
Learning how to set customer expectations before a service job is one of the simplest ways to reduce avoidable conflict.
Many complaints are not caused by terrible work.
They are caused by:
unclear communication.
The customer expected one thing.
The business delivered another.
A stronger process clarifies:
Appointment
↓
Arrival Window
↓
Price
↓
Scope
↓
Exclusions
↓
Additional Work
↓
Payment
↓
Follow-Up
Before the technician begins, the customer should know:
what is happening
what it costs
what is included
what might change
what happens next
Do not rely on assumptions.
Document important details.
Send confirmations.
Communicate delays.
Get approval for changes.
Explain temporary repairs clearly.
Train technicians not only to complete the work, but also to explain it.
Good expectation setting protects:
- customers;
- technicians;
- office staff;
- margins;
- reputation.
The best customer experience is not created by promising:
everything will be perfect.
It is created by making sure the customer clearly understands what they are buying and what they should expect.
A well-run service business should aim for:
No Surprises
except:
better service than the customer expected.